Want to share your content on R-bloggers? click here if you have a blog, or here if you don't.

It’s not common for Shiny Developers and Data Scientists to have strong design and frontend/web development skills. They usually prefer working with data, quickly visualizing it, and try to avoid diving into the complexities of CSS.
Getting buy-in within an organization for technological projects is hard. Many decision-makers are sceptical – they’ve seen projects running out of budget and timeline.
Being able to effectively communicate your idea using real business data in one day in an engaging manner sets you apart and accentuates the value of your proposition. {ShinyUiEditor} package serves as a tool to facilitate such quick prototyping and presentation of data without the technical hindrances of app development.
In this article, we will discuss how to get started with {ShinyUiEditor}, its features, and how you can use it to build your Shiny apps.
TL;DR:
- {ShinyUiEditor} is an R package offering an easy-to-use visual editor that caters to developers who aren’t UI-oriented.
- Benefits include rapid prototyping and simplified UI design, making it quicker and cost-effective, even for small teams.
- Key features include an interactive UI layout skeleton, live app preview, and drag-and-drop UI components.
What is {ShinyUiEditor}?
{ShinyUiEditor} is an R package and a drag-and-drop visual editor for R Shiny apps. It allows developers who aren’t UI-oriented to manage the UI-related part of development easily and intuitively using a graphical interface.
This tool promotes rapid prototyping, agile development, and swift feedback adaptation. By simplifying UI design, even smaller teams can produce polished apps with consistent branding, streamlining the development process to be quicker, more cost-effective, and less dependent on specialized UI expertise.
{ShinyUiEditor} is officially out of its ‘alpha’ phase! Discover the exciting new features in this latest update.
How to Get Started
- First, install the {ShinyUiEditor} package (see the Installing section).
- To launch the editor in your browser, simply run this command:
shinyuieditor::launch_editor(app_loc = "shiny-app/")
If the shiny-app folder doesn’t exist in your working directory, you will need to select one of the available templates for your app at the beginning.
There are four templates available at the moment:
{ShinyUiEditor} Features

{ShinyUiEditor} Features
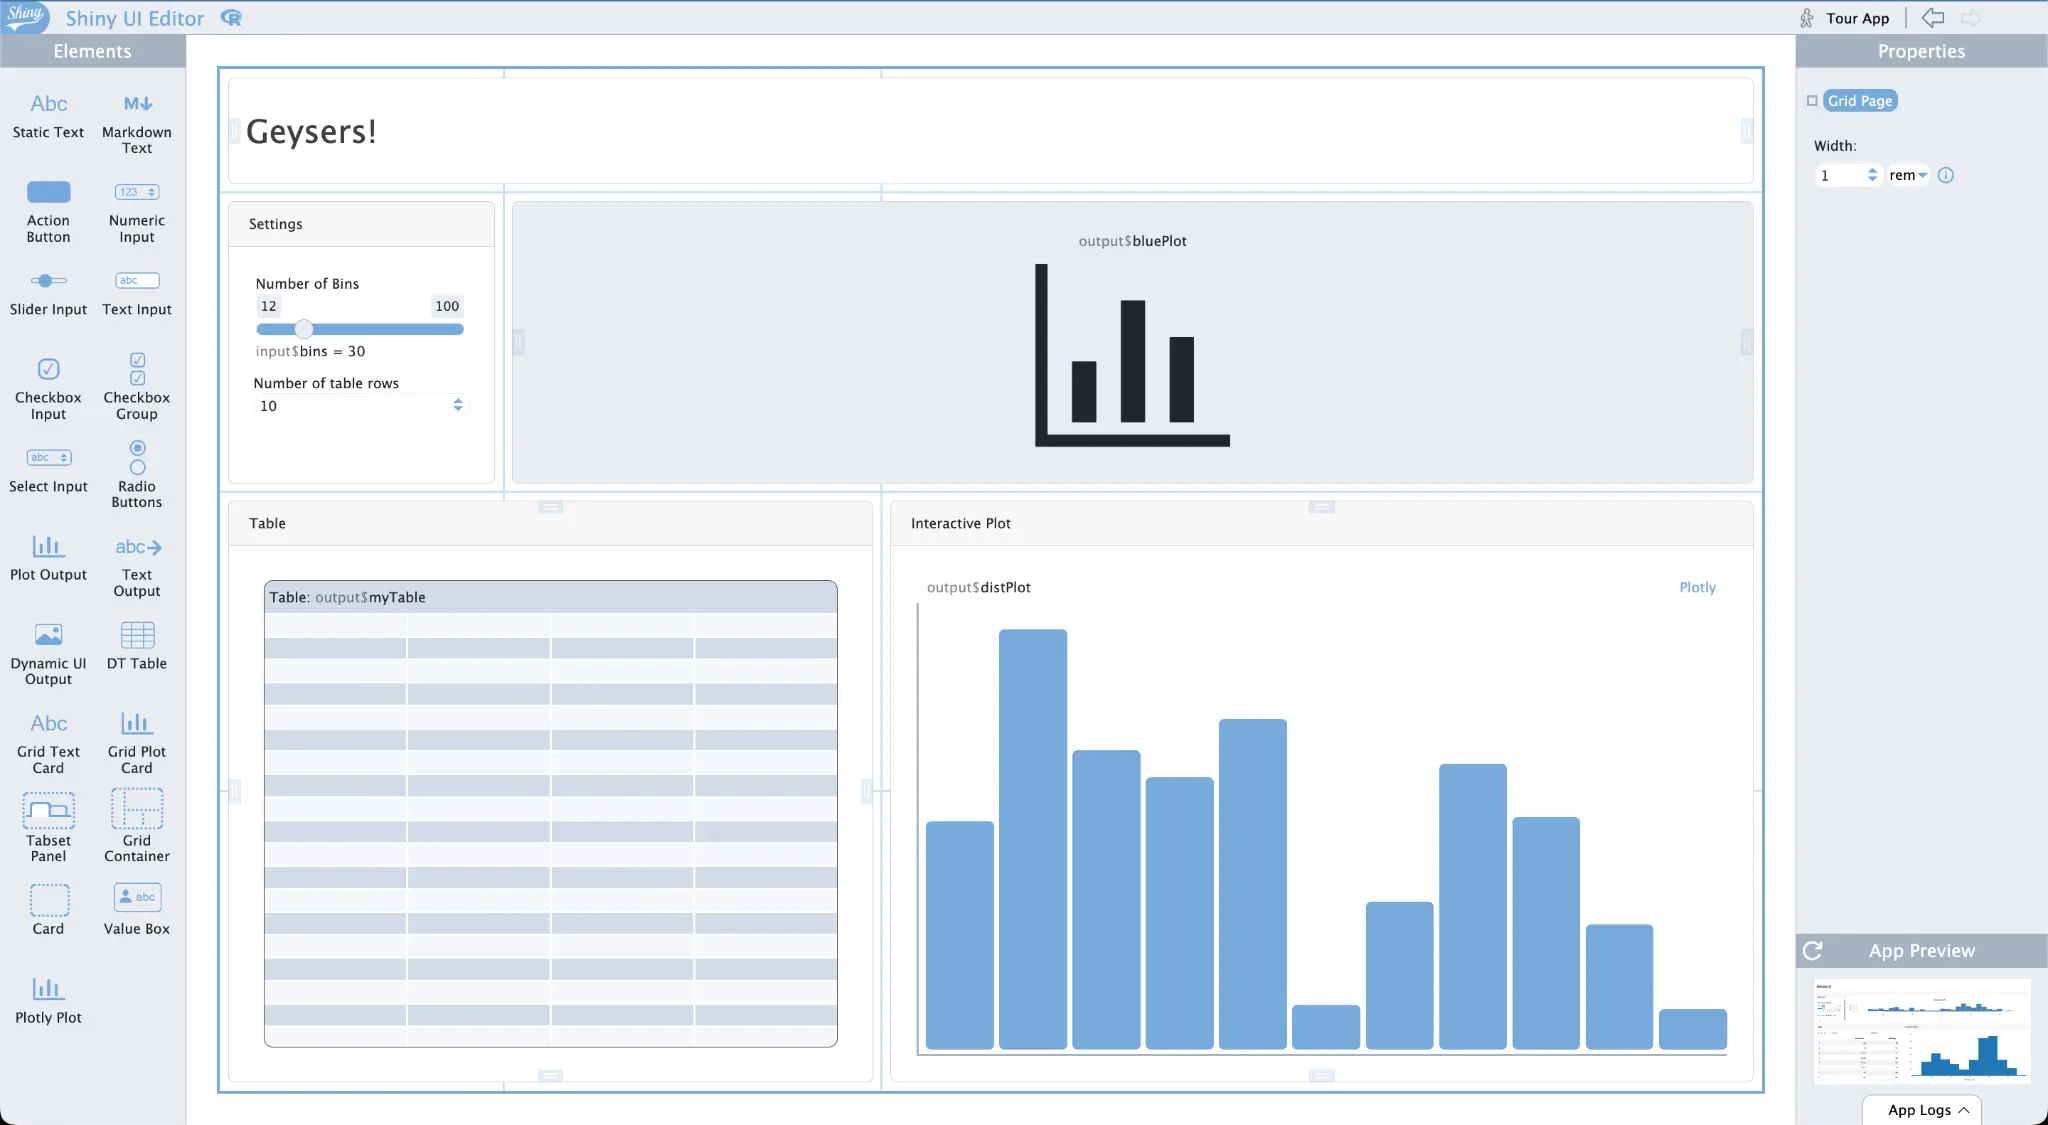
After selecting a template, you will see the {ShinyUiEditor} interface, which comprises:
- A main section with an interactive UI layout skeleton, serving as a schematic, visual representation of your app.
- A live app preview area, displaying the current appearance of your Shiny app.
- A left sidebar with UI components that can be dragged and dropped onto the main section of the UI editor.
- A properties panel in the right sidebar, allowing easy adjustment of component and layout parameters.
{ShinyUiEditor} empowers developers to easily and comfortably adjust the layout and components without needing to write code. You can add new components or move existing ones by simply dragging and dropping. Adjusting the layout’s column and row sizes is a breeze, thanks to drag handles and sizing widgets. Changing component settings and undoing/redoing changes is straightforward.
Have a look at this short demo:
Check the official website for more information
R Code Generation
How is it connected to the Shiny app? In the background, every change in the {ShinyUiEditor} triggers the regeneration of the app.R file, containing the R code for your app’s UI. This file is generated initially when you select the template.
Let’s run this app and see how the workflow looks in action:
Development
Step by step, let’s walk through how {ShinyUiEditor}’s features transform your developer’s experience.
- Launching the {ShinyUiEditor} Interface: The {ShinyUiEditor} interface can be launched from a separate terminal, allowing you to update the UI using this tool in parallel during development.
- Real-time Code Synchronization: Any change in the editor instantly updates the regenerated R code. Subsequently, you can update the Shiny app code, resulting in updates on the {ShinyUiEditor} side as well. However, it’s important to note that some custom source code changes can break the {ShinyUiEditor}.
- Interchangeable Development Workflow: The app development process can seamlessly occur both in your IDE and the visual UI editor interchangeably, with {ShinyUiEditor} package managing the code synchronization process in the background.
- Fine-tuning & Iterative Design: After updating the R code, you can fine-tune the app’s appearance in the editor and repeat this process.
- Optimizing Development Preferences: Depending on personal preferences, some changes may be easier to implement using your IDE, while the {ShinyUiEditor} can offer a more efficient and faster option for others.
Conclusion
{ShinyUiEditor} is a game-changer for R Shiny developers as it bridges the gap between data analysis and UI design. The ability to rapidly prototype and deploy applications can provide a significant competitive advantage. For businesses, this also translates to reduced development costs and enhanced agility in responding to market needs.
Unlock the full potential of your R Shiny projects — our team of experts is here to guide you every step of the way.
You can also check out this article on user interface design for Shiny apps.
The post appeared first on appsilon.com/blog/.
R-bloggers.com offers daily e-mail updates about R news and tutorials about learning R and many other topics. Click here if you're looking to post or find an R/data-science job.
Want to share your content on R-bloggers? click here if you have a blog, or here if you don't.
